Baking a cake that celebrates a loved one’s passion for basketball is one of the most fun and rewarding ways to add a personal touch to any event. Whether it’s a birthday, a game-day party, or a team celebration, a basketball-themed cake brings an exciting visual punch and, of course, deliciousness to the table. If you’ve been wondering how to make a basketball cake that’s as impressive as it is delicious, you’re in the right place! In this article, you’ll learn everything from selecting the right cake base to decorating it in creative ways that will make your dessert a showstopper.
Let’s dive into the step-by-step process to create a basketball cake that will leave everyone talking.

What You’ll Need to Make a Basketball Cake
Before you start creating your basketball cake masterpiece, it’s essential to gather the right ingredients and tools. Here’s a breakdown of what you’ll need.
🛒 Essential Ingredients and Tools

To create a basketball cake, you’ll need the following ingredients and tools:
Ingredients:
- Cake Ingredients:
- 2 ½ cups all-purpose flour
- 1 ¾ cups sugar
- 1 cup unsalted butter, softened
- 4 large eggs
- 2 teaspoons baking powder
- 1 teaspoon vanilla extract
- A pinch of salt
- ½ cup milk
- Frosting and Decoration:
- Orange gel food coloring (or powder)
- Black gel food coloring
- 1 ½ cups butter, softened
- 3 cups powdered sugar
- 1 teaspoon vanilla extract
- 2-3 tablespoons milk (for the frosting consistency)
- Fondant (optional for extra detailing)
Tools:
- 8-inch round cake pans (or a basketball-shaped mold, if you want to get extra creative)
- Piping bags and tips (for fine details)
- Offset spatula (for smoothing frosting)
- Mixing bowls
- Cake turntable (optional, but helps with smooth frosting application)
Having everything ready will ensure the process flows smoothly and your cake looks and tastes perfect!
Step-by-Step Guide: How to Make a Basketball Cake
Creating a basketball cake is not as tricky as it might sound. Let’s walk you through each step, so you can make your cake a slam dunk!
Step 1 – Baking the Cake Layers
1. Preheat the Oven:
Start by preheating your oven to 350°F (175°C). Grease your cake pans with butter or cooking spray and dust them lightly with flour, or line them with parchment paper to avoid sticking.
2. Mix the Cake Ingredients:
In a large bowl, sift together the flour, baking powder, and salt. In a separate bowl, cream together the softened butter and sugar until the mixture is light and fluffy. Add in the eggs one at a time, mixing well after each addition, then stir in the vanilla extract. Gradually mix in the flour mixture, alternating with the milk until you have a smooth batter.
3. Pour and Bake:
Pour the cake batter evenly into the prepared pans. Bake for 25-30 minutes, or until a toothpick inserted into the center comes out clean. Allow the cakes to cool completely before removing them from the pans.
Pro Tip: If you’re making a round, layered basketball cake, consider using a sphere mold to shape the cake like a basketball. Alternatively, you can stack regular round cakes and carve them into a sphere after they’ve cooled.
Step 2 – Creating the Basketball Texture & Color
Now comes the fun part—making your cake look like a basketball!
1. Prepare the Frosting:
For the frosting, combine the butter, powdered sugar, vanilla extract, and a few tablespoons of milk in a bowl. Beat until smooth and fluffy. Add orange food coloring to the frosting until you achieve a rich, basketball-like orange color.
2. Frosting the Cake:
Once your cake layers are cooled, spread a thin layer of frosting over the entire cake to create a “crumb coat.” This helps seal in any loose crumbs and gives you a smoother final finish. Chill the cake for 15 minutes to set the crumb coat, then go ahead and add the second, thicker layer of orange frosting.
3. Texture the Basketball:
For that signature basketball texture, use a fondant roller or a textured fondant mat to roll out a sheet of fondant. You can gently press the mat over the cake to create the dimpled texture you see on a real basketball. If you don’t have a mat, use a fork to create similar textures in the frosting.

Step 3 – Adding Details & Decorations
The details are what will truly make your cake stand out. Here’s how to finish it off.
1. Create the Basketball Lines:
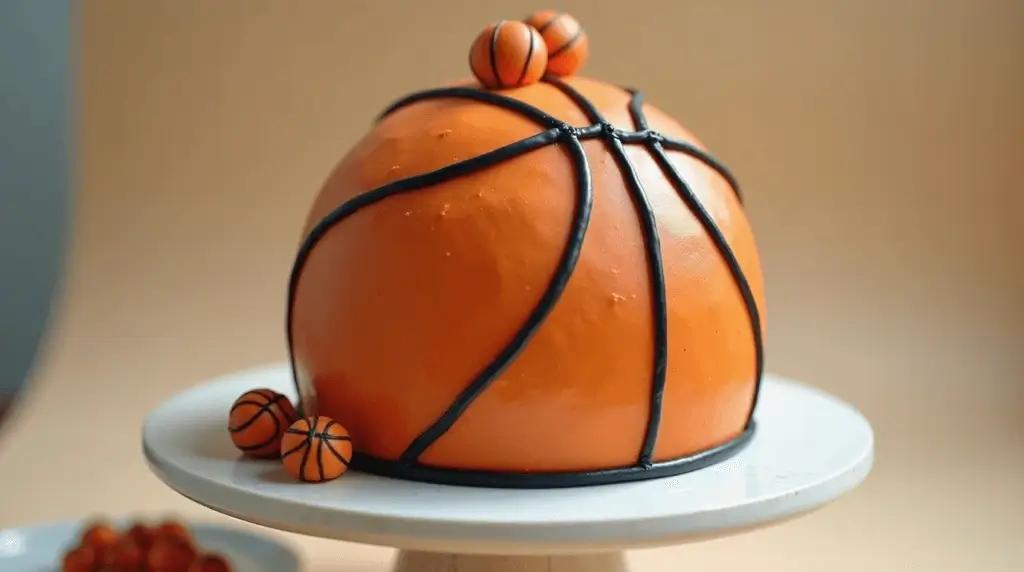
Using black icing (or black fondant), pipe the signature basketball lines onto the cake. You can do this by drawing an “X” on the top of the cake and then adding curved lines to complete the basketball’s iconic look.
2. Personalize with Additional Decorations:
Want to make it even more personal? You can add your favorite team’s logo, a player’s jersey number, or even small edible basketballs as toppers. You can also use piped icing to add fun elements like basketball hoops or court markings on the side of the cake.
Step 4 – Creative Variations & Customizations
This is where your creativity can shine! Here are some exciting variations you can try:
Mini Basketball Cupcakes:
Not a fan of large cakes? Make mini basketball cupcakes instead! Use the same frosting and techniques, but pipe the orange frosting onto cupcake tops, and create the basketball lines using black icing.
Layered Cakes:
If you love the idea of creating a more dynamic, multi-dimensional design, you can stack multiple cake layers to create a tiered basketball hoop or a basketball court design.
Personalized Cakes:
Add a personal touch by including the recipient’s name, team logo, or a memorable quote from their favorite player. You could also create a cake with a jersey number on it if it’s for a special team event or birthday.
Pro Tips for a Perfect Basketball Cake
To make sure your basketball cake turns out just as you envisioned, here are a few tips to keep in mind:
- Avoid Overbaking: Keep a close eye on your cake as it bakes. Overbaking can dry it out, which can make it harder to work with when decorating.
- Use Gel Food Coloring: Gel food coloring provides a deeper, richer color compared to liquid food coloring, ensuring your cake’s orange color stays vibrant.
- Work in Layers: If you’re using fondant for texture or detailing, work in small sections. This ensures that your cake looks polished and you have better control over the final design.
- Use a Cake Turntable: If you’re serious about smooth frosting, a cake turntable helps you rotate the cake as you frost, creating a perfectly even layer.
FAQ: Everything You Need to Know About Making a Basketball Cake
Q: Can I make a basketball cake without a special pan?
Absolutely! You don’t need a specialized basketball-shaped cake pan. You can stack regular round cakes and carve them into a sphere once they’ve cooled. Or, simply use a sphere mold for a perfect shape.
Q: How do I get the perfect orange color for the cake?
To get that vibrant basketball orange, mix red and yellow gel food coloring into your buttercream or fondant. Gel food coloring is best because it doesn’t water down the frosting like liquid coloring does.
Q: What’s the best way to store a basketball cake?
Store your cake in an airtight container to preserve its freshness. It will stay fresh for about 2-3 days in the refrigerator, depending on the type of frosting used.

Conclusion: Make Every Celebration a Slam Dunk!
Now that you’ve learned the step-by-step process for creating a stunning basketball cake, it’s time to roll up your sleeves and get baking! Whether you’re celebrating a birthday, a sports victory, or just want to surprise someone with a fun, personalized treat, your basketball cake will be the star of the show.
Don’t be afraid to add your personal touches and get creative with the design. And, most importantly, have fun with it! After all, baking is all about enjoying the process and sharing your creations with others.
If you’ve tried making a basketball cake, we’d love to hear how it turned out! Feel free to share your creations or drop any questions you have below. Your next celebration is just a cake away from being a slam dunk!


1 thought on “How to Make a Creative Basketball Cake for Any Occasion”